Showing posts with label before and after. Show all posts

Friday, April 20, 2012

Stenciled Chalk Paint Table


If you spend as much time reading furniture and design blogs as I do, you’ve probably read about Annie Sloan Chalk Paint. Well, I had read about 5 million blog posts where people use this magic chalk paint to change their furniture into a Paris flea market find look alike. I had two major issues with this:

  1. While the chalk paint was cute on romantic antiques, I was sick of seeing people apply a "cottage chic", "parisian flea market" style to Danish midcentury modern tables. It just didn’t make sense to me. Some of the furniture looked great, but did every piece of furniture a person laid their eyes on need to be painted? And in this way? Gahhhh.
  2. It’s freaking $36 a quart. And by the way, you really have to buy wax to put over it, which is another $26. 
But really my main reason was that there’s this real snotty side of me who just isn’t interested in embracing something seemingly ordinary that everyone else thinks is awesome, especially when I can see how it all turns out online. It’s the same reason why I never read the Harry Potter books. I mean everyone and their mother (literally) was reading it, and I already knew the story, and I didn’t feel like reading a bunch of long books just because everyone else loved them. I’m doing my same snotty move when it comes to the Hunger Games. I also fully rejected Uggs. There are some trends I embrace fully, but those are just some that I have snubbed.

Which is why you may be surprised that this post is about my first experience with chalk paint. Yeah, I caved. It happened after I went into a store for Benjamin Moore paint chips and asked the color consultant what her favorite whites for furniture were. And then I had this conversation:

Color Consultant: “You’re painting furniture? Have you tried that Annie Sloan Chalk Paint?? Oh my gosh, my sister and I picked up some paint and a bunch scrap wood and tried a bunch of different treatments. It is so fun!”
Me: “Nahhh, it’s just so expensive.”
Color Consultant: “But it goes so far! And there’s so much you can do with it!”
Me: “Huh yeah maybe I’ll try that…anyway, do you recommend any whites?”

This store didn’t even sell Annie Sloan Chalk Paint. But it was around that point that I decided if I was going to be even semi-professionally involved in this industry, I should try this new and popular product.  Plus, I’ll admit, I was curious. So I headed to Stifel and Capra in Falls Church and picked up a quart of Annie Sloan Chalk Paint in Provence from the stockist, Stylish Patina.


I decided to do a paint/stain treatment on an end table I bought on Craigslist. Before I applied the chalk paint, I had to sand and stain the top. I applied Minwax Dark Walnut stain to the surface. After the stain had dried for a couple days (not necessary, just my lack of time), I lined the edges of the table with painters table to prevent the paint from getting on the recently stained table surface.


Then I took to my adventure with the chalk paint. And I have to say; it was really easy to use. I applied two coats of paint and let it dry. The next night, I used the same stencil that I created for my desk to stencil the surface of the table while watching Say Yes to the Dress Atlanta, My Big Fat Gypsy Wedding, and Duck Dynasty on TV with my roomie. It was a wild Friday night.


After the paint dried, I went over the edges and details with a sanding wedge. Then I used a rag to wipe off the dust so that I could apply my wax. I ended up buying the Annie Sloan wax because it was high quality, easy to use, and I would’ve had to order other recommended wax so the price seemed worth it. I also splurged and bought a waxing brush because, well, I just love new tools and this one looked so cool.

Waxing was mega easy. I used Miss Mustard Seed’s video tutorial, and I highly recommend you do the same.

After I applied clear wax and let it dry for a while, I used a little bit of my Dark Walnut stain mixed with the clear wax and applied it to the table with a chip brush. I let it dry a tiny bit, and then spread it and wiped off the excess with a clean cloth. I really liked using this technique because I didn’t have to by dark wax (saving me another $26), and because it gave the color some very subtle depth.

The next day, I used a cloth to buff the table, giving it a subtle sheen.


I’m very happy with how the table came out, and I definitely understand why so many people are using chalk paint. It applies easily, and the best part about it is that it’s not supposed to look perfect, so if you make some mistakes, it just adds to the character. And because it covers very well with just two coats, and is easily watered down to give more of a wood-wash look, it does really go a long way. This paint looks good, and it goes on quickly. It may be $36 a quart, but time is money, right? 

I can’t say that I’m going to start painting every piece I see with chalk paint, but I’m definitely going to keep it in my stash and use it when I feel a piece is calling out for it. 

And oh yeah, this table is probably coming with me to the Lucketts Spring Market May 19-20 if I don’t sell it earlier! (If you didn't know I was selling, check out this post.)

Thursday, February 23, 2012

Herringbone Side Table

Update! My furniture restlessness continues, and this table is now for sale in my shop


Wayyyyy back when, I showed you that the nightstands I planned to use in my room were majorly small compared to my big beautiful grownup bed. I replaced the tables with bookshelves, which are still there. One of those little tables has been sitting in my dining room (also known as Sarah’s furniture storage space, sorry roomies) for a while.

I haven’t been happy with the side table (which I refinished) next to our sofa for a while, so I decided to nix it and move my ex-nightstand into our living room. Only, white painted furniture looks kind of odd in our living room because we have an ugly rental neutral on our walls, and the white looks a little dirty. And I kind of rushed to finish a paint job on this little guy (girl?) before I moved out of my parents’ house, so it needed a new paint job anyway.

Ummm this corner is really dark, so please excuse the hideous attempt at photo editing.  

Read more after the jump!

Thursday, February 16, 2012

Helping My Desk Chair Grow Up a Little

Confession: When I posted pictures of my desk last month, I was kind of embarrassed about the blue and green desk chair. The patterns in the fabric and on my desk competed with each other, the blue didn’t connect with anything like I expected it would, and the whole ensemble looked childish. I knew I needed a change.

Let me refresh your memory. Here's what the chair looked like when I first showed you my desk:


And here's what it looks like no that I've helped it grow up a little:


Thursday, February 2, 2012

Our TV Console Gets an Upgrade

I’ve always been intrigued by the ways that some people modify furniture for different purposes, and I’ve always wanted to take on a project of my own.  But I also have a tough time taking a nice, solid wood piece of furniture and modifying it a ton. So when I came across this decent but not super nice dresser at the Goodwill near my house and discovered that one of the drawers wasn’t in the best of shape, I knew it was a great candidate to be repurposed.


The plan? Make it into a TV console to replace our blond Ikea (maybe, might as well be) TV stand in our living room. I would take the middle drawer out, add a shelf, and then convert the drawer front into a door that closes when we’re not watching TV. Perfect!


Wednesday, January 25, 2012

Moroccan Stenciled Desk

Guys. I’m really excited to present this project to you not only because I’m pumped about the way it turned out, but because it represents a major victory against months of procrastination. It's also a victory for No Shop January because I had already purchased all the materials to finish it forever ago, it was just a matter of getting it done.

A month after we moved into our house, I bought a solid wood white desk on craigslist. It needed a lot of work, so I took it directly into our basement where I immediately got to work on it  it sat for 5 months. In my defense, I bought it in mid-October, which can kind of be the end of the furniture-revamping season on account of the shorter and colder days. But really that’s not a good excuse, because all I needed to do was sand, it’s not like I needed to paint it outside.

Here's the before:


And here's the after:


Tuesday, January 3, 2012

It's a Coffee Table Post...about My Coffee Table


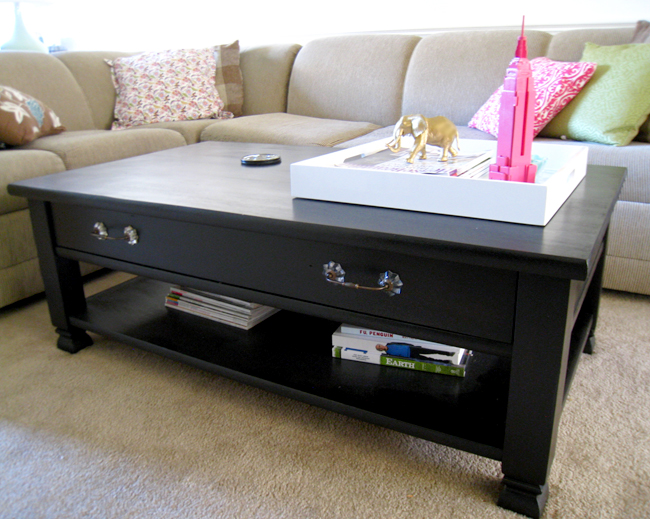
Last year I bought a coffee table on Craigslist from a family with four kids, and boy did they leave a mark on it. Literally. It was totally beat up. But it was also only $20 and solid wood for the most part, so I scooped it up with the intention of refinishing it.

A word to the wise: Don’t buy a piece of furniture in October that you intend to refinish unless you are willing to live with it as-is until the spring…or however long it takes you to get around to finishing the project. We lived with our beat up coffee table for a year until I decided on a whim to try to finish it before my cousins came to visit.

So one day when I came home from work, the table looked like this:


And when I was done working for the night, it looked like this:


And I looked like this:

Caution: Don't try to live on the edge like me and wear flip flops while sanding.
Always wear closed-toe shoes when using power tools. 
It was a dusty endeavor.

When it comes to refinishing furniture, this ain't my first rodeo. A while ago I refinished my big girl bed, and I also stained a piece of wood to make a coatrack. To tackle this project, I took it into our backyard and went after it with my power sander (I own this Ryobi sander, but this similar Black and Decker sander would work fine too). The finish came off super easily, and I was able to sand through a lot of the scratches and dents in the surface.  I started with the tabletop and then moved to the legs. That’s when I realized that I would be better able to sand and stain the entire table more thoroughly if I took the table apart.


A lot of tables can be easily de-constructed by removing screws on the underside of the tabletop. After removing the legs from the tabletop and shelf, I finished sanding the tabletop portion and legs and called it a night. I left the drawer and the shelf for another day.


While most of the table is solid wood, the shelf is made of a very thin veneer. That means I couldn’t just take a power sander to it. To make sure I thoroughly removed the finish without hurting the shelf, I decided to strip the finish off and then lightly sand it with sandpaper.

But, I was doing all this in the fall, so by the time I got home from work it was dark and kind of chilly—not good when you’re trying to strip a piece of furniture. Luckily, because I took the table apart, I could use a water-based stain to begin staining the tabletop and legs in our basement each night when I got home from work.


To stain the table, I used General Finishes Water-Basedstain in Espresso, which I had leftover from a previous project. I applied the stain evenly in sections using a foam brush, and wiped it off using pieces of an old t-shirt. I think I applied four coats in all.


When the next Saturday rolled around I set up shop outside and used a disposable paintbrush to apply Citristrip to the shelf. I let it sit on the surface for about 4 minutes, and then used a plastic stripping tool. I didn’t let it sit longer because it started to dry after that point.

In order to prevent myself from damaging the veneer, I was very careful with the stripping tool, allowing it to skim the surface and remove the finish without scraping the wood.


After stripping off the finish and cleaning off the stripper residue (snort), I let the shelf dry overnight inside.  Then I stained it using the same technique as the tabletop and legs.

After all the surfaces were stained, I used a foam brush to apply three coats of a MinWax Polycrylic Protective Finish in Satin. I let it dry over night, moved table back up to our living room in pieces, and put it back together.

I picked up some drawer pulls at Home Depot thinking that they were standard and would fit the coffee table drawer. Silly me. It turns out that a lot of standard drawer pulls are 3” wide, but the holes in my drawer were 4” apart. I found some drawer pulls on anthropologie’s website (similar ones currently available) that were the right width, ordered them in 4 colors, decided on the ones I liked best, and returned the rest. 

The table is admittedly a little large for the space, and the finish is a bit darker than I'd like -- it looks almost black in certain light, but I still think it's a major improvement over its previous beat up state. And, I'll be able to sell it for more on Craigslist when I eventually decide to move or find another piece for the space.


I’ll be back later this week with more overdue projects!

Linked to: My Uncommon Slice of Suburbia

Related Posts Plugin for WordPress, Blogger...