

Last year I bought a coffee table on Craigslist from a family with four kids, and boy did they leave a mark on it. Literally. It was totally beat up. But it was also only $20 and solid wood for the most part, so I scooped it up with the intention of refinishing it.
A word to the wise: Don’t buy a piece of furniture in October that you
intend to refinish unless you are willing to live with it as-is until the
spring…or however long it takes you to get around to finishing the project. We lived with our beat
up coffee table for a year until I decided on a whim to try to finish it before
my cousins came to visit.
So one day when I came home from work, the table looked like this:

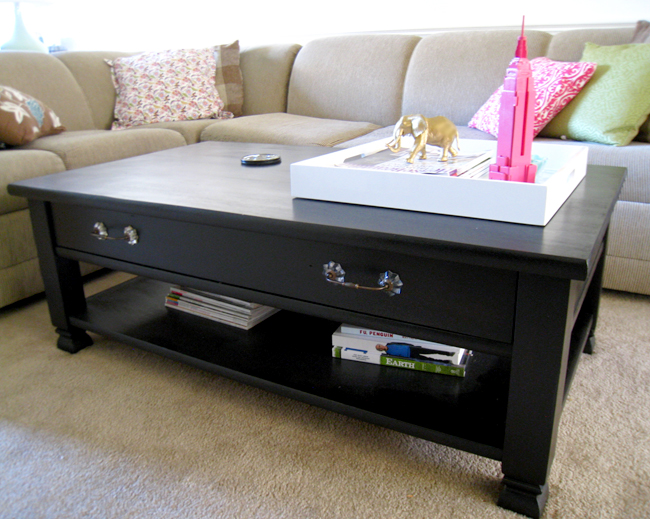
And when I was done working for the night, it looked like
this:

And I looked like this:
 |
| Caution: Don't try to live on the edge like me and wear flip flops while sanding. Always wear closed-toe shoes when using power tools. |
It was a dusty endeavor.
When it comes to refinishing furniture, this ain't my first rodeo.
A while ago I refinished
my big girl bed, and I also stained a piece of wood to make
a coatrack. To tackle this project, I took it into our backyard and went
after it with my
power sander (I own this Ryobi sander, but this similar Black and Decker sander would work fine too). The finish came off super easily, and I was able to sand
through a lot of the scratches and dents in the surface. I started with the tabletop and then moved to
the legs. That’s when I realized that I would be better able to sand and stain
the entire table more thoroughly if I took the table apart.

A lot of tables can be easily de-constructed by removing screws on the underside of the tabletop. After removing the legs from the tabletop and shelf, I finished sanding the tabletop portion and legs and called it a night. I left the drawer and the shelf for another day.

While most of the table is solid wood, the shelf is made of
a very thin veneer. That means I couldn’t just take a power sander to it. To
make sure I thoroughly removed the finish without hurting the shelf, I decided
to strip the finish off and then lightly sand it with sandpaper.
But, I was doing all this in the fall, so by the time I got
home from work it was dark and kind of chilly—not good when you’re trying to
strip a piece of furniture. Luckily, because I took the table apart, I could
use a water-based stain to begin staining the tabletop and legs in our basement
each night when I got home from work.

To stain the table, I used General Finishes Water-Basedstain in Espresso, which I had leftover from a previous project. I applied the
stain evenly in sections using a foam brush, and wiped it off using pieces of
an old t-shirt. I think I applied four coats in all.


When the next Saturday rolled around I set up shop outside
and used a disposable paintbrush to apply Citristrip to the shelf. I let it sit
on the surface for about 4 minutes, and then used a plastic stripping tool. I
didn’t let it sit longer because it started to dry after that point.
In order to prevent myself from damaging the veneer, I was
very careful with the stripping tool, allowing it to skim the surface and
remove the finish without scraping the wood.

After stripping off the finish and cleaning off the stripper
residue (snort), I let the shelf dry overnight inside. Then I stained it using the same technique as
the tabletop and legs.
After all the surfaces were stained, I used a foam brush to
apply three coats of a MinWax Polycrylic Protective Finish in Satin. I let it
dry over night, moved table back up to our living room in pieces, and put it
back together.
I picked up some drawer pulls at Home Depot thinking that
they were standard and would fit the coffee table drawer. Silly me. It turns
out that a lot of standard drawer pulls are 3” wide, but the holes in my drawer
were 4” apart. I found some drawer pulls on anthropologie’s website (similar ones currently available) that were
the right width, ordered them in 4 colors, decided on the ones I liked best,
and returned the rest.
The table is admittedly a little large for the space, and the finish is a bit darker than I'd like -- it looks almost black in certain light, but I still think it's a major improvement over its previous beat up state. And, I'll be able to sell it for more on Craigslist when I eventually decide to move or find another piece for the space.
The table is admittedly a little large for the space, and the finish is a bit darker than I'd like -- it looks almost black in certain light, but I still think it's a major improvement over its previous beat up state. And, I'll be able to sell it for more on Craigslist when I eventually decide to move or find another piece for the space.

What an amazing transformation! It really does look like a brand-new piece now!
ReplyDeleteYou are a hard core woman! I know how hard it is to sand a table like that down! Great job! It looks so great! :)
ReplyDelete~Lisha
This comment has been removed by the author.
ReplyDeleteThanks guys!
ReplyDeleteYour table looks amazing! You really worked wonders on it.
ReplyDeleteWow! The table looks amazing! Your hard work paid off! I would love for you to come share over at passionatelyperfect.com
ReplyDeleteBeautiful job... it hardly looks like the same table!
ReplyDeleteBeautiful transformation!
ReplyDeleteWow! What a gorgeous rescue! You did an awesome job!
ReplyDeleteJust gorgeous, and you would never guess what it looked like before. Thanks for sharing!
ReplyDeleteIf my wife was like you we would be the best couple in the world. you are amazing. on your projects I see myself . all the attention to the detail etc.
ReplyDeleteGOODDDDDDDDDDDD JOOBBBBBBBBBBBBBBBBB
Hello there,
ReplyDeleteI just stumbled upon your blog via Pinterest, and I’m addicted to your work! This table makeover started it all.
Even better are tips, tricks, and sources you provide.
I too like to take seen-better-days furniture and repurpose them. Here in WI, we cannot sand or spray paint anything outdoors during the winter months, so it's like a stockpile of furniture over here.
Keep up the amazing work!
Trisha D.
Thanks so much Trisha! Here in VA it's a little cold to be doing projects outside too, so I've been trying to stick to things I can accomplish indoors. Can't wait to spend some time going through your blog too!
DeleteGreat post! This looks awesome! You give me hope for redoing my coffee table and end tables! WTG, girl!
ReplyDeleteAlso, stipper residue. LOL ;)
I just want to say, that table looks fabulous!!! And did anyone else make an outloud snort at the stripper residue point? Or am I totally weird...lol
ReplyDelete