
A month after we moved into our house, I bought a solid wood
white desk on craigslist. It needed a lot of work, so I took it directly into
our basement where I immediately got to work on it it sat for 5 months. In my defense, I
bought it in mid-October, which can kind of be the end of the
furniture-revamping season on account of the shorter and colder days. But
really that’s not a good excuse, because all I needed to do was sand, it’s not
like I needed to paint it outside.
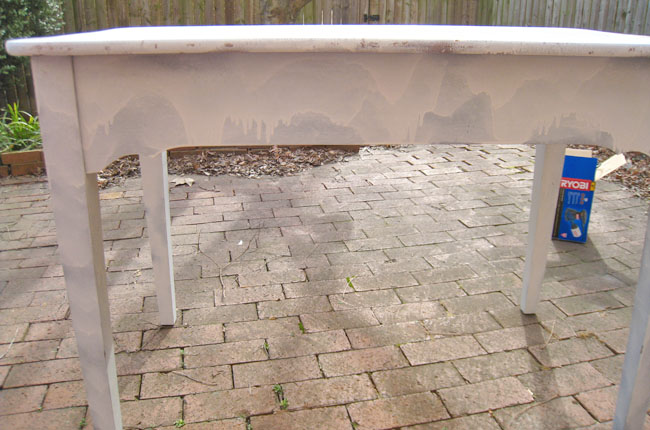
Here's the before:
Here's the before:

And here's the after:


The desk looked like someone had attempted to spray paint it, and the finish was terrible. It was flaking off in places, it had drip marks on the back, and it was totally uneven. The desk had one real drawer and two fake drawers, and the real drawer had this ugly dark green on the inside. So one day in March I felt inspired, took the desk outside, and sanded it.


I had a hard time getting to the areas around the fake
drawers and up against the tabletop with the power sander, so I hand-sanded
that part with pretty rough sandpaper. Because I intended to paint the desk, I
didn’t have to worry about taking off the finish completely. Then I wiped it
off with a dry cloth followed by a damp cloth and took it inside.
I prefer to paint inside because there’s a tree in my backyard
and I don’t want any leaves or debris to fall on whatever I’m painting,
especially if it’s white. So I took the desk inside, put down a drop cloth, and
got to work painting it white (which I totally forgot to take a picture of). I
like to use mini foam rollers and a trim-painting paintbrush.
Once I finished painting the desk white, I moved it up into
my room and let it sit for, well, a while. Then, one night I gained some
momentum and decided to stencil the surface of the desk (which I had planned to
do for a while). I had looked into stencils for a while, but all the ones I saw
online were so expensive, and the ones at the craft stores were a little
stuffy. So I decided to make my own using some manila folders I had laying
around.
I found a picture of a Moroccan pattern online and printed
it out in a few sizes to see what it would look like on my desk.

Once I decided on a size, I traced the pattern with a
sharpie over the initial pattern so that it would bleed through to the folder. Then
I drew lines where I couldn’t cut so that the middle part of the pattern stayed
connected to the rest of the stencil. Then I cute out the stencil with a craft knife.

After I made the stencil, I measured the desktop and found
the center point. Then I taped the stencil down immediately to the right of the
center point and used a pencil to trace the pattern onto the desk. I
repositioned the stencil gradually until the pattern repeated across the entire
desktop. You could also go the other direction and cut out the outline of the pattern, and trace around it, not inside of it.


Using a small paintbrush and a sample of Martha Stewart’s
“Beet” paint, I filled in the pattern. And man oh man did that take forever.
And then I had to go over the pattern two more times. Which I managed to put off over the course of many months. It wasn’t flawless, so
afterwards I used a small paintbrush and some white paint to correct some
flaws. It was keeping momentum on this very tedious process that I struggled with, and is the main reason this took so freaking long. And then, once I finished that process, I felt like the desk needed something
else, so I added another step to my lengthy process by painting the edge of the table top with a slightly larger
paintbrush. It was so worth it -- I really thinks it makes the pattern pop.
After the painting was done, I went over my pattern with
Minwax Polycrilic because I read on various blogs that it didn’t yellow, which
was mega important for my white paint. At first I used a foam brush, but I didn't like the way it was leaving a little lint behind (something I hadn't noticed on my previously protected dark surfaces) so I used a new paint brush instead.
Finally I attached the anthropoligie knobs that I had
admired forrrrevvvvvverrrr. I actually mentioned it in this post from a while
ago. I actually bought the round knobs, but they turned out to be 1) way too
big and 2) really poorly finished.


So there you have it: my project, over a year in the making.
Has anyone else stenciled furniture lately? I feel like I see painted patterns on furniture on all kids of blogs and Apartment Therapy before and afters. Martha Stewart has a great new line of stencils at Michael’s that are
a lot more affordable than some of the online retailers, and better suited for
smaller projects. I’m eager to use those for another project, but I’ll have to
tell you about that later.

P.S. After seeing this chair that I redid against the desk, I think it’s way too colorful. So it has plans to be given a makeover sometime soon, I hope. I’m thinking a stain, since I like the dark-white contrast. Good thing Citristrip can be used inside!
Update: I finished re-doing the chair. Now check it out with the desk:
And of course, the before and after:

Thanks for featuring this project! Savvy Southern Style, Saved by Suzy, My Repurposed Life, Redoux
Linked to: Somewhat Simple, The Shabby Creek Cottage, Someday Crafts, Primitive & Proper, Saved by Suzy, Domestically Speaking, Miss Mustard Seed, House of Grace, Savvy Southern Style, Beyond the Picket Fence, Thrifty Decorating, The Shabby Nest, 504 Main, Redoux, French Country Cottage, My Repurposed Life, Tatertots & Jello, Under the Table and Dreaming, Creations by Kara, Blue Cricket Design, WhipperBerry, The Scott's Crib

Hi Sarah, I saw this on FB through your Mom and my sister (Autumn). This is gorgeous! I love it. I'm going to pin it. :) You did an amazing job! Do you read the blog Miss Mustard Seed? She made my son's Union Jack dresser and did a blog post on it: http://missmustardseed.com/2012/01/jacks-home/
ReplyDeleteThanks, Jody! And yes, I did see Miss Mustard Seed's post, but silly me, didn't actually read it, so I couldn't put two and two together. I love Ben's room, and that dresser is so cool.
ReplyDeleteThis is simply gorgeous!! Great revamp! The gold knobs really make it too!
ReplyDeleteJust stopping by from YHL. I love your desk! And did you get your chair fabric from Amazon.com? I wanted that same fabric, but can't find it on there anymore. Crossing your fingers that you got it somewhere else and remember what it was called :).
ReplyDeleteThanks, Heidi! I actually got the fabric from my local Jo-Ann Fabrics. It was part of their section of upholstery fabrics that they just have on the folded bolts (not the un-rollable ones). They also had it in brown and black. Those fabrics are almost all $10/yard, but they seem to go on sale for 40% or 50% off!
Deletewow, sarah! this is fabulous! i love the stencil and new hardware- it looks amazing!!
ReplyDeleteGreat job! I love how this turned out and I'm impressed that you made your own stencil too. Thanks for joining my party.
ReplyDeleteI saw your linky over at Miss Mustard Seed. You did an incredible job on this little desk. The stencil turned out awesome and what a great way to make your own. Thank you for sharing :)
ReplyDeleteThis is incredible...and you made your own stencil...girl you are something else! I'm so glad I found your blog. I'm follower #12 so stop by and follow too, so we can keep in touch. Hugs, Lori
ReplyDeletethis is fabulous! I am in love with it! Makes me wanna go hunt for a desk haha-- Great job! I am now your newest follower! Stop by mine if you have time!
ReplyDeleteThanks for the kind comments everyone!
ReplyDeleteIt came out darling- great job on it! Would love for you to come share at Feathered Nest Friday too!
ReplyDeleteWow!! It was definitely worth all that time and effort!! Great job!!!
ReplyDeleteI love the design you added to this desk. Just gorgeous. Thanks for joining wow.
ReplyDeleteThank you so much for the feature, Kim!
DeleteI'm featuring this beauty at my party tomorrow. Thanks for linking!
ReplyDeleteWow! Thanks! I've really enjoyed your blog!
Deletewow! your stenciled desk turned out beautiful! Great tute! Thanks so much for linking up and linking back to catch as catch can. I'll be "catching" you this week.
ReplyDeletegail
Nice....very nice job. Love it.
ReplyDeleteIt looks awesome and I love your blog. I'm your newest follower. Come on over for a visit any time you like
ReplyDeleteJenny
www.simcoestreet.blogspot.com
Hi, I really like your work! its amazing, which is making me asking you if you can help in giving me some ideas about a boring looking desk,I would appreciate any ideas.
ReplyDeleteAlyaa
If you have a picture, I'd be happy to help!
DeleteWow! This desk turned our really cute! You did great - I love it! I'm going to check out the Martha Stewart stencils at Michaels too.
ReplyDeleteI am probably your newest follower as of today! Love your style of writing and your desk project really caught my eye. If you can paint a design like that by hand, after cutting your own stencil, you can do ANYTHING, girl!! I love projects too, but would never have the patience to do it the way you tackled this one!! Great job!
ReplyDeleteThanks so much!! I will grab the button and display it proudly :)
ReplyDeleteJust wanted you to know I featured your desk on my blog today!
ReplyDeleteI like how the desk turned out, but I am not a fan of your knob choice. They seem to stick out too far and look a little bulky. But the beet color for the design is just wonderful!
ReplyDeleteIt looks great but you made a lot of extra work for yourself. You made a stencil, so why didn't you actually use it as a stencil and paint over it, allowing the paint design to go through the cut areas?
ReplyDeleteIf you didn't want to actually stencil paint it, you didn't have to put it on manila folder and cut it out. You could have just put your design on clear tracing paper, placed transfer paper under your tracing paper design, and pressed down with your pencil while tracing around the design edges, This would transfer it to the table surface and the tracing paper is transparent, allowing you to see where to place the design. Then you would paint it just as you did.
Love your desk! I can't wait to do something similar. Thank you for sharing.
ReplyDeleteSaw you on Roadkill Rescue - fabulous transformation. What a perfect size that desk is! I love the quatrefoil and the pink... you did an amazing job!!
ReplyDeleteThis is great!! Do you by any chance have a link to the stencil? Or at least know what the measurements of the stencil was?
ReplyDeleteI get so many requests for this image -- I really need to find it and link to it. I might also have it saved, so I can make it downloadable if I get a chance. I'll try to get that done sometime this week!
DeleteVERY GOOD JOB!!!!
ReplyDeletethank you for this DIY from france
Hello! I am new to your blog. I found this blog post very insightful. I am about to start painting my walls and I printed out a stencil but got stuck in trying to figure how to cut it out without cutting out the middle part. I am so glad I ran into your blog post. Thank you so much for the wonderful tip.
ReplyDelete