Hey friends! Wow -- I owe a big THANK YOU to Miss Mustard Seed because her Furniture Feature Friday sent a ton of traffic to the desk I posted last week. If you found this blog from her lovely site, I'm very glad to have you!
This weekend I wrapped up work on a project that has been a long time coming, and made it just in time for the Superbowl party my roommates want to host this weekend. I'm just waiting on some hardware to finish 'er off. Which should come today. Yay!
Not surprisingly, the hardware is from Anthropologie. I got it on sale, so I was able to keep the very pretty knobs to $3/piece (plus shipping). This purchase will involve a return (and trip to the Anthropologie store, double yay!) because I couldn't decide which hardware I wanted. I'm incredibly indecisive, so I use this strategy probably too often. Oh well, whenever I watch HGTV Sarah and Genevieve and Candace always bring in multiple options and choose their favorites.
I'm leaning towards one right now, but I'm going to wait to make my final decision until I test them out tonight. It's so hard to see what something will look like until you actually test it out. Here's a glimpse of my purchase:
Note that I bought 9 of one type of knob, which I did because the review noted that they weren't totally well constructed. I need 7. Consider the extra two backups.
I'll be back tomorrow, Wednesday, Thursday, or whenever I get around to photo-editing/writing the post.
P.S. Man oh man, I have a crazy hankering for Bodo's Bagels right now. Is that weird? It's a favorite food spot right across from the UVA campus ("grounds", otherwise known as). Fellow former Charlottesville residents--does this ever strike you? Or maybe you are craving Take It Away? $2 pitchers (duh)? Do you ever get a crazy hankering for your favorite college food? Is this a sign that I need to go back to grad school? Or take a day trip to Charlottesville? Does anyone want to go with me? Is this too many questions?
OK, back to work.
Monday, January 30, 2012
Friday, January 27, 2012
Adventures in Sewing a Zipperless Pillow
Before I dive into this little pillow-making tutorial, first
let me introduce you to my new(ish) friend, Suzy the sewing machine:
She’s a pre-WWII Singer Featherweight sewing machine. So
she’s kind of a new-to-me situation. My grandma has a similar one that she and
my mom have used to sew many beautiful things, including both of these lovely
Halloween costumes:
That pumpkin isn't on my dress -- it was on the scanned picture. Side note: Don't ever dress your 5 year old up like a bride for Halloween. She will not know how to answer the question, "Where's your groom?" every time she rings a doorbell, and so she will get snotty. And if you are 5 and you're reading this, 1) how impressive and 2) definitely pick what you want to be for Halloween before your mom gets any ideas.
But I digress.
My mom always wanted my sister and I to have our own featherweights, and she saw this one at the shop where she took hers to get serviced. It was a very pleasant non-birthday, non-Christmas surprise. Suzy doesn’t have a lot of bells and whistles, so she’s very easy to use. I decided to break her out and make a pillow for my first project.
I bought this pink patterned fabric on fabric.com, but
before you go chasing it down, you should know that I bought it over a year
ago. That seems to be a theme this week.
I decided to do a zipperless pillow because, well, zippers
intimidated me. My mom always made them sound hellish, but she was always sewing clothes costumes. I found out last month
that when it comes to pillow sewing, zippers are pretty easy. But I consider this
pillow more of a step one, so we’re starting here.
I picked up a 14” pillow on sale at Joann’s Fabrics. In
hindsight, I wish I had splurged a little bit more because this pillow is very
flat. Next time I will buy something a little more plush.
First, I measured and cut a piece of fabric about 16”
square. That sounds like a lot, but, it’s better to cut too big than too small. And this was my first try, so I was leaving room for error. I cut the back pieces after looking at a flap-close pillow I had at home, and I determined that the
overlap should be an inch or two. With about a ½” hem, that meant that I needed
between two and three inches more than my initial 16” square, so I cut a piece
of fabric to be 16” x 19”. Then I cut the 19” piece in half.
Next came the sewing process. I needed to hem the overlap
sides first so that it could be sewed into the square, so I folded one side of
each of the smaller pieces over and sewed a hem. Once those two pieces were
hemmed on the open side, I placed the 16” square face up, and placed the two
back pieces face down so that all the sides lined up. Then I pinned around the
sides, pointing the pins towards the center of the pillow.
Once all the pins were in, I was ready to start sewing. I started in one corner, reinforcing the initial stich by sewing forward, backward, and then forward again. After going around all four sides, I reinforced the last stitches and cut the thread. Then I picked another corner, reinforced the first stitch, and sewed around the square again.
After I finished sewing, I turned the pillow inside out so that it was, well, no longer inside out. Then I placed my pillow form inside the pillowcase.
And that’s when I determined it looked really, really limp. No worries! I took the pillow form out and flipped the pillow cover inside out again. I did another two stiches about ½” inside the original stitches to shrink the size of the pillow. Then I tested the pillow again, and it looked much better. Once I determined that the pillow cover was the right size, I took it off the pillow, cut the edges to shrink the excess a bit, and cut the corners diagonally so that there wasn’t a bunch of extra fabric stuffed in the corner.
Now the pink pillow resides on our couch, but I’m thinking
about snatching it for my bed soon. Of course, that will be after I sew some
new ones for the couch. Oh, and don't be fooled into thinking that I still have my Christmas decorations up. This was just the best picture I have of our couch pillows right now. Which reveals that yes, I completed this project a little while ago. You caught me.
Has anyone else taken up a new sewing project lately?
Wednesday, January 25, 2012
Moroccan Stenciled Desk
Guys. I’m really excited to present this project to you not
only because I’m pumped about the way it turned out, but because it represents
a major victory against months of procrastination. It's also a victory for No
Shop January because I had already purchased all the materials to finish it forever ago, it was just a matter of getting it done.
And here's the after:
A month after we moved into our house, I bought a solid wood
white desk on craigslist. It needed a lot of work, so I took it directly into
our basement where I immediately got to work on it it sat for 5 months. In my defense, I
bought it in mid-October, which can kind of be the end of the
furniture-revamping season on account of the shorter and colder days. But
really that’s not a good excuse, because all I needed to do was sand, it’s not
like I needed to paint it outside.
Here's the before:
Here's the before:
And here's the after:
Wednesday, January 11, 2012
Guest Post at Chic Done Cheap: Tips for Refinishing Furniture
Hey friends! Check out my guest post on Chic Done Cheap where I shared some tricks for refinishing furniture (like my coffee table)!
Tuesday, January 10, 2012
Keep Calm and...Come Play with Us
Every time Christmas or her birthday rolls around, I never quite know what to give my grandma. This is the woman who babysat my brother when my mom went back to work, took us to the beach every summer, took my sister and I on shopping sprees for our birthday, attended every sporting event and awards ceremony she possibly could, and even paid for my college education. Basically, she is amazing so I want to make sure I do something that will make her happy.
The only problem is that like many reasonable people her
age, she doesn’t really want more stuff. She has tons of interests and I could
give her endless accessories for her house, but she doesn’t need any more
seashell-themed things for her living room. She is beautiful and has a great
sense of style so we do buy her some clothes, but we want to do more than give
her a couple sweaters for Christmas.
This year, instead of giving her stuff, we decided to give
her an experience. My grandma loves spending time with us (who can blame her?)
and we sure enjoy her company too, so my sis and I decided to take her to tea
with my mom this year.
But this is not a post about the tea party…because we
haven’t gone yet (we’ve all been busy). We are planning to go this weekend.
This post is about the invite. The challenge with giving
someone an experience is that unless you have tickets to unwrap, the whole
gift-giving process is kind of dull. I
decided to make an invitation in Photoshop, although I think it would be pretty
easy to make it in Word too.
The invitation was a play on the “Keep Calm and Carry On”
British World War 2 poster that you see all over the place.
To make the poster, I downloaded the “Keep Calm” font from K-Type.com,
which even the crown icon. First, I made the background color pink. Then I made
I separate text box for the crown icon, “Keep”, “Calm”, “and”, and “Drink Tea”
so that I could easily control how close together each line was. Once I sized
everything properly, I arranged all of the items so that their center points
were aligned.
Next, I created a new Photoshop document to be the back of
the invitation. Using the same font (not in all caps) I wrote, “Your lovely
granddaughters and daughter invite you to channel your inner Kate Middleton and
join us for afternoon tea at Peacock Alley in the Willard Hotel in Washington,
DC.” I didn’t specify the date because my grandma is a super busy lady and I
wanted to see what her schedule was like first. And I kept the crown on the
front rather than a tea cup because I mentioned HRH on the back.
I printed the invite on cardstock from a regular inkjet printer and put it in an envelope for her to open on Christmas day.
She loved it, and we can’t wait to go get tea together. I
think that the Keep Calm poster makes a great invitation, and you could use it
in many ways—bridal and baby showers, birthday parties, etc.
Thursday, January 5, 2012
Well Hello Pretty Ladies
For a year, my roommates and I sat in our living room with nothing hanging above our pretty big sectional besides a tiny picture I found at Home Goods. And for a year, I wondered what the heck to put there.
I pinned a lot of ideas for artwork over the wall to Pinterest but just wasn’t quite sure what I liked. One thing I was sure of? We needed large artwork of some kind and I needed it cheap.
We came close to getting one option: a series of four vintage Mademoiselle cover prints from Z Gallerie. But at $50, it was out of my budget and I wasn’t even sure if four pictures would like good enough in this space.
![]() |
| via |
I especially liked this gallery wall that I saw on Pinterest:
| Via Pretty Stuff (original source anyone?) |
| Via Layla Grace |
Ding! (That’s the sound of a light bulb turning on above my
head).
This isn’t the first time I’ve used calendars for artwork.
In college I took apart a calendar and put up all over my dorm room. When I did
it then it looked ridiculous, but I always maintained, like many other
bloggers, that calendars can be a great source of affordable artwork.
I picked up the 2012 Barbie Calendar at Bed Bath, and
Beyond. I wasn’t sure how many of the prints I wanted to use – I was thinking 6
or 8 in large frames with big mats. I figured I would probably paint the frames
because our living room is kind of lacking in the color department,.
It seems that framing section at Michael’s is perpetually on
sale, so I figured I could get a pretty good deal on a group of their nicer
frames. My first option was a group of six 12x16 frames. They were originally
$30, marked down to $15. Which still sounded like a lot when I was thinking
about buying six of them.
Not to mention, the price of mats big enough to fit in the frame
put the total for each one over $20, making this project ring in to the tune of
$150—a whole lot more than I was trying to spend.
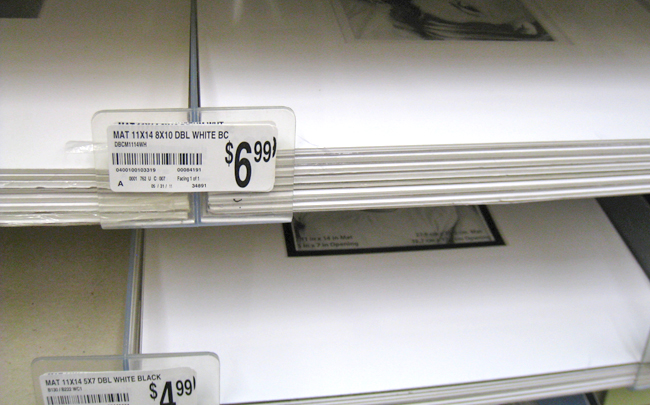
My second option was a matted frame around the same size as
option one for $12.99 each. When I did the math of six or eight of those
babies, it was still pretty pricey.
Then I looked at the shelf above option two. There, I found
a 10x13 frame matted to 8x10 for $5. I hadn’t really thought about displaying
all twelve pictures, but at this price it was my cheapest option. So I took
home 12 frames in white and oatmeal (since I was planning to paint them
anyway).
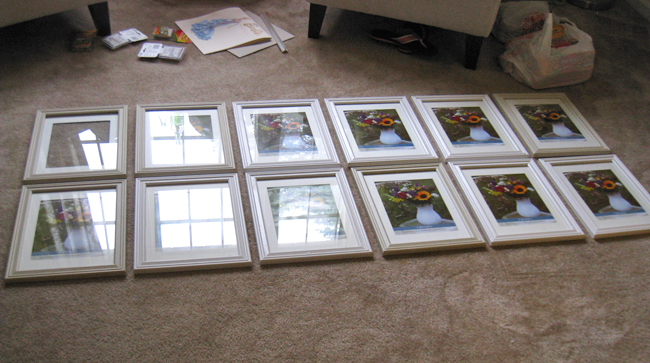
First, I placed all 12 picture frames on the floor in two
rows of six to see how large it would be.
It didn’t seem very big on the floor, but I wanted to see what it was like on the wall just to be sure. To do this, I used scrap paper and catalogs to make a template for each frame, and hung them on the wall with painter’s tape.
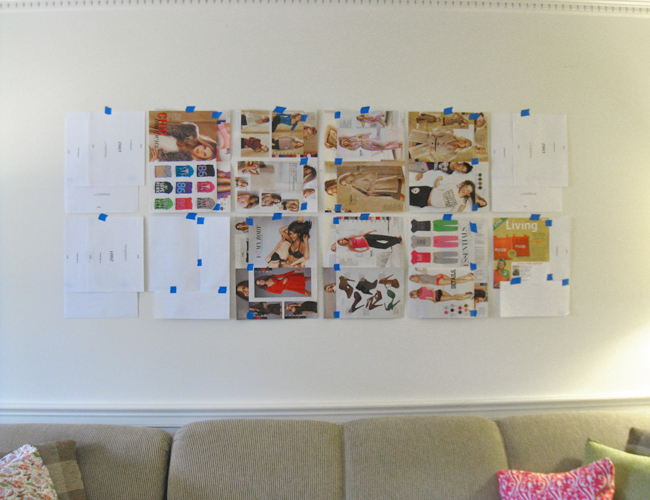
| We call this photo "channeling our inner teenage boy". Yes, those are pages of one of the 50 Victoria's Secret catalogs we receive every week. |
I decided I liked all 12 frames, so I proceeded with my
plans to paint them. I settled on a
lavender spray paint with one or two frames painted a darker purple. First I
took all the mats and glass out of the frames.
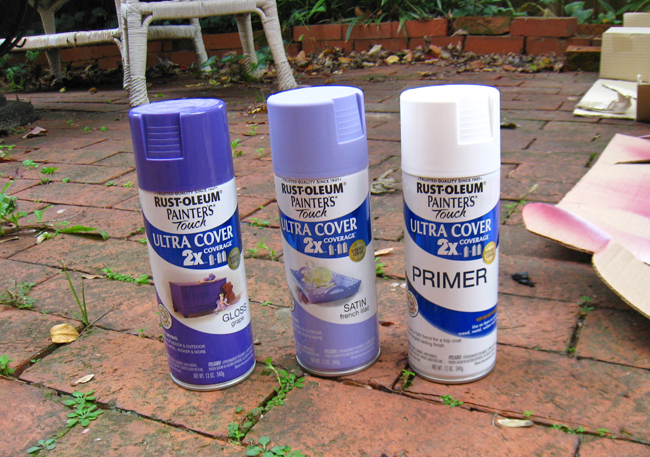
Then I placed the frames on a matt outside and painted the
frames in shifts so that I could get around them easily. I decided to put a
layer of primer on the frames because they weren’t real wood and I hope that
the Primer would help the spray paint adhere.
First, I removed the staples from the centerfold of the calendar. Then, I cut each piece of paper down the fold with a craft knife. I had to keep reminding myself that the calendar pattern was on the back of half of the images in the calendar.
Many of the prints were actually bigger than 8x10 opening,
so I broke out my high school yearbook knowledge and used the mat to crop each
picture. I tried my best to include the feet as much as I could, but I ended up
having to cut some of them off. I’m hoping that unlike a photo on a yearbook
page, it looks a little bit artistic and not silly.
I cut the images slightly smaller than the whole mat so that
I could tape them to the back of the mat exactly as I liked them.
Once everything was cropped and taped, I put the glass and
mats and prints in the frames and began the very tedius hanging process. I
tried to make life easier for myself and our walls by using 3M Command Strips
to hang the frames. That way we would have fewer holes to patch when we moved
out (we live in a rental) and it would be a lot easier to hang them precisely
in a grid.
I started from the a top center picture and worked my way out until I hung 6 frames in a row. I used a combination method of a ruler and a level to mark where on the wall I needed to hang the frames.
Once I hung the top row, I moved on to the bottom, again making my way out from the center. Then I stepped back and looked at the whole thing and determined I needed to make some adjustments. Luckily the frames were easily to remove from the wall, so I eyeballed the adjustments until everything was straight.
Well...I wish it was perfectly straight. This is not a good
project for extremely perfectionists because it seems almost impossible to get
the entire grid to look right. But it’s good enough.
The first time around I had only painted one frame dark
purple. Once everything was on the wall I decided it needed another dark
accent, so I took a frame down, pulled the glass and print out of it, and
re-sprayed it a darker color.
And voila! Vintage fashion print artwork gallery over our
couch.
Some of the places that I found the Barbie calendar show it
as art in a kid’s room, but I think it works here. In fact, most people have no
idea that they’re Barbie prints when they see the arrangement. I know it’s
super girly, but like I said before, when else will I be able to do something
so girl in my living room?
I haven’t even told you my favorite part about this whole
thing. The price!
Here’s the budget breakdown:
Barbie Calendar - $12
12 Frames x $5 each - $60
Primer Spray Paint – had already
Lavender Spray Paint x 2 - $7
Dark purple spray paint - $3.50
Artwork Total: $82.50
The Command Strips added about $20 to the budget, but
they’ll save us money when we don’t have to patch holes before we move, and I
would’ve had to pay for mounting hardware regardless of what art I bought. So
for a little over $100, we have art above our couch.
$100 still always sounds like a lot of money to me, but I
know that this is a great value for the price, especially considering that the
price per framed print came in under $10 each. AND then there’s this fun piece
of info.
The original Barbie inspiration piece? Well, I followed it
to the source and found that the prints displayed on the wall sell for $100
EACH! And if I wanted to, I could’ve probably painted the frames a similar
color to the high-end prints to make them like even more similar. There are
definitely ways to dress these babies up even more.
So there you have it, a $1200 piece of artwork done for
$100. Can I get a woohoo?
Has anyone else done something cool with calendars as art? I
plan to keep using them and even recycle my 2011 letterpress calendar that hung
on the wall in my cube at work. But that project requires more materials so it
will have to wait until after No Shop January!
Speaking of No Shop January, today was a success! I was at
work late and very tempted to pick up a pizza on the way home, but I resisted
the temptation and cooked up chicken tacos when I got home. Score one for me.
Wednesday, January 4, 2012
Monthly Challenge: No Shop January
I decided that to aid in that sometimes-lacking feeling of accomplishment that can come with my quasi-grownup state, I'm going to take on some kind of challenge each month of 2012. Today I am declaring this month No Shop January.
It doesn’t ring quite as well as “No Shave November” (which
I did NOT participate in), but that’s what I’m calling it nonetheless.
Last year my old roommate, who loved to buy super cute
clothes online, decided to do “No Shop November” to accompany her boy toy’s “No
Shave November” and save some much needed moolah. Well…I looked at my credit
card statement last weekend and realized just how expensive December was. And I
also realized how much money I spend on impulsive purchases and projects every
month. I don’t think my bank account can wait until November and I really want
to get better at saving, so I am holding my own No Shop January to start the
year off on the right foot.
I’m trying to set reasonable terms in hopes that I can be a
little less impulsive in the following months, so here’s how this is going to
work: I’m making a list of non-allowable expenses and making a few
exceptions so that I’m not completely devoid of a life this month.
No spending allowed
on:
- Clothing, shoes, and accessories
- Random makeup like lipstick or nail polish
- Random stuff from Target that I have a tendency to pick up when I’m grocery shopping there, including plastic containers and holiday decorations
- Sewing and crafting materials
- Tools (Anything I don’t have I will borrow from my parents—who will be surprised to read this)
- Wine or beer from the grocery store
- Fast food/restaurants when I’m eating alone
- Groupons/Living Social Deals/Flash Sales
Exceptions:
- Shopping with gift cards from Christmas is allowed.
- I am allowed to buy the blender that I have been thinking about buying for a while so that I can make green smoothies.
- If a Groupon or Living Social deal comes up for the yoga studio that I really want to attend but can’t afford, I am allowed to buy it.
- The boy and I are allowed to spend money out to eat for date night, but we should try to use my restaurant.com gift cards to snag a good deal.
- Groceries are allowed, but impulsive purchases of craving foods when I already have perfectly edible food in my house are not allowed.
- I am allowed to buy materials within reason for a project that I plan to at least start in January. That means I should try to use paint that I already have, but if I decide on another color that would work best, I can buy the small quantity of paint. I can also buy a new foam roller if I need one and the hardware I need to retrofit this specific piece of furniture. The key is that this project is done within reason and that I take inventory of the materials I already own before buy more.
Strategies for seeing
this through:
- Delete flash sale and store emails immediately.
- Read Living Social and Groupon deals quickly and delete them if they don’t have the yoga place I’m looking for.
- Plan meals better so that I don’t need to eat out.
- Start and complete the project I’ve been planning to do instead of taking on new ones.
- Write blog posts about the projects I’ve already completed instead of taking on new ones.
In addition to a halt on impulsive shopping, I am also
taking steps to get my finances better organized. I am plan to open another
savings account or two – one for short term savings projects one for long-term,
don’t touch, save for an emergency savings.
I am also planning to do more structured saving. I live in a
spacious house with great roommates…in a so-so location for me. It’s close to
my office but not as close to Metro as I would like, and not walkable to bars
and restaurants I got to like I wish it was. I don’t really want to move
because our rent is dirt cheap and I like my living situation. So, to make sure
I am actually benefiting from the money I’m saving by choosing to live a bit
farther out of the urban areas than I’d like, I am going to start saving the
difference between what it would cost me to live in one of those places and
what I pay now into savings, contributing a small portion for short term and a
bigger portion for long term.
And so begins No Shop January. I’ll try to keep you updated
about how I’m doing, what’s tempting me, and how I’m being resourceful and
using what I have to do a few projects around the house.
Oh, and by all means, feel free to join me in this endeavor!
I know I’m not the only Savvy Young Something who wants to get savvier by
getting her spending under control. If you decide to join, leave a comment here
or on my facebook
page, or send me a tweet
letting me know you’re taking on the challenge!
P.S. I’ll be back
tomorrow with an update on a project I took on a little while ago. Hint: It
involves this pretty lady.
Subscribe to:
Posts (Atom)