

We really lucked out getting a townhouse with as much space as we have for the price we pay. But the problem with having a lot of space is…well…it’s kind of an invitation to fill it. And no one can fill up extra space like four girls. So while we have a spacious coat closet right in our entry way, we found pretty quickly that there was no room for guests’ coats and some of our coats in the closet. So rather than continuing to pile up coats on the chaise lounge my roommate got out of her parents’ basement, I decided to make a cheap/simple/stylish fix.
The solution: a coat rack in the form of a rack of hooks that can hang on the wall. I came to this solution for a few reasons. First, we wanted something wall mounted, and we needed one that was 40”+ long. Those are hard to find and can be pretty expensive. Second, I didn’t want to put a ton of holes in the wall right there because we are renters and it’s always good to minimize the number of holes we have in a wall when possible. Third, I wanted to be able to customize the coat rack so that it was non-ugly, and so that I could hang it on studs rather than having to use wall anchors. And oh yeah, there was also the entertainment/fun value of me taking on another project.
I could've gone for ordinary hooks in this project, but I have a slight obsession with hardware. As in I have been known to go on trips and snap photos of cool doorknobs.
World Market has really cool anthropologie-esque hardware that I’ve always wanted to use in a project, so I went over there and snagged 8 hooks and knobs for about $27. I got three hooks (two the same color) for $1.99 each, a set of two glass flower knobs for $4.99, a cool blue knob for $3.99, and two pretty cool ceramic painted knobs for $5.99 each (they were a splurge, so they were just so cool!)
 |
| One of my many hardware pics. This one is a beautiful doorknob I saw on a house in San Juan, which is full of awesome hardware. |
Once I bought the knobs, I took them home and laid them out on our floor. To give coats enough space to hang, I decided to hang the knobs about 6 inches from the center of each one. This made the space from knob 1 to knob 8 42 inches (because you multiply 6 inches by the number of spaces between knobs, which is 7, not eight). I then added 3 inches on either side of the knob and determined that I needed a board 48 inches long. I measured this length out on the wall I planned to hang it on, and it worked well for the space.

Because some of the knobs had screws built into them (as opposed to just running through them so you could remove it and use a shorter screw), the board had to be deeper than the screw itself in order for the board to lay flush with the wall. I measured the screws and determined I needed something at least 1 ½ inches deep. I went on an adventure to Home Depot and found a 2x4 stud, which is about 1 ½ inches deep, and had it cut to 48 inches. I used a medium grade 2x4 because I was worried that the nicer wood was too dense and therefore heavy to hang on the wall. Plus the medium grade was cheaper and it’s not like we’re attempting to furnish the White House here.
I measured the holes out on the front of the board and drilled holes large enough for each screw to slip through. That wasn't too tough.

This is the part of my story where I tell you that a $15 drill from Target that you may have hanging out in your toolbox from college is not powerful enough to bore large holes in a piece of wood. Because I needed to wood to be flush with the wall but I also needed to secure the screws to the wood, I had to drill holes 1” in diameter into the back of the piece of wood. I went to Home Depot and got this drill bit that it supposed to do the trick, and would’ve, except that my drill wasn’t quite powerful enough. So I ended up starting with the drill bit, drilling a few random holes in the circle created by the drill bit, locking the drill and manually twist the drill bit in order to create the hole big enough for each screw to connect through with enough of the screw sticking out for me to attach a nut to it. I definitely recommend investing in a better drill for this, since my process took forever. After that battle, the rest of the process was pretty easy.

Since a stud is meant to be inside a wall and not hanging on it, the wood was pretty rough and had a few stamps on it. To prep the wood, I sanded it with 120 grit paper, followed by 220 grit. This gave me an opportunity to smooth the wood and off some of the stamps that were on the wood.
Once I finished my sanding and removed the dust with a damp cloth, I applied a General Finishes water-based espresso stain, which I had leftover from another project. I used a foam brush to apply the stain because I find that it goes on a little more evenly. I let the stain sit for a minute or two and then buffed the excess off with a piece of an old t-shirt (from my pile o’ t-shirts-they-handed-out-like-candy-in-college that I don’t wear anymore).

The great thing about water-based stain is that you can pretty easily apply it indoors. I started this project on a nice day outside, but brought it inside when I ran out of time to add another coat before it got dark. I set up my $19 pair of sawhorses and the drop cloth that my nurse roommate brought home from the hospital, and added the second coat in our basement/beer pong room. After I applied two coats and let them dry overnight, I covered the entire piece of wood with three coats of MinWax Polycrylic Protective Finish in Satin. I really wanted a matte finish, but Polycrylic is also water-based and can therefore be applied inside, so I made the sacrifice. I also don’t expect this thing to take a beating; otherwise I would’ve used a more durable oil-based finish.
After I let the protective finish dry overnight, I attached the knobs using a combo of a wrench and need-nose pliers to tighten each nut onto each screw. After securing the knobs and hooks, I used my handy dandy stud-finder (no, I haven’t used it to find a studly man friend, and yes, that’s a super cheesy joke) to find where the wall studs were closest to the end of the boards but within the 48” piece of wood (hehehe…get your mind out of the gutter). That way I could attach the wall-mounting hardware to my new coat rack so that I could screw the hardware into the studs, making the piece of wood hung sturdily (this just keeps getting worse) to the wall, and also preventing me from having to use wall anchors, which create holes that would be a major bi-otch to patch when we move out of our rental.

The hardware I used was the type that has one piece that you screw onto the thing your hanging, which you then slip down over the screw you’ve anchored into the wall. I know that is an incredibly confusing description, so just check out the picture below. Make sure that when you use this you hang it with the hole that the screw can fit on the bottom, otherwise the screw won't attach to the hardware.

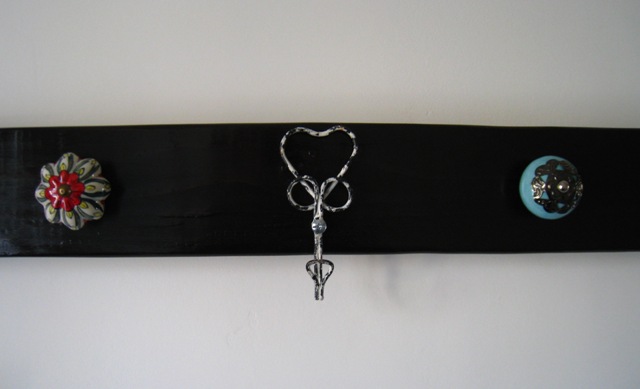
Now we have a place to hang our coats and a pretty decoration right inside the doorway, which apparently doesn't get fabulous light as it appears in this picture.


This entire project only cost about $39, and a rack this size (ha!) would’ve probably cost a lot more than that in a store, if I could even find one I like. Here’s a list of materials I used:
- Knobs/hooks from World Market -- $27
- 2 x 4” wood stud -- $3 (and I still have about 40” left over)
- General Finishes Water Based Espresso Stain – had already, but you can find a small can of water-based stain at Home Depot for under $10, and have plenty left to tackle another project
- MinWax Polycrylic Protective Finish (Satin) -- $8
- Mounting Hardware – about $1 (can’t remember exactly)
Total for this project: $39
Next time you're looking for a quick storage solution, consider this one. It could easily be done in an apartment as long as you're cool with sanding in the bathtub and staining in your living room. Who are we kidding? In the spirit of this innuendo-filled post, you've probably done weirder things there before anyway.

No comments:
Post a Comment
Thanks so much for your comment! I try and answer any questions directly in the comment section, so check back for my answer later.