


Inspired by my recently purchased but not yet received anthropologie gold knobs with white patina, I decided to makeover the knobs currently on the dresser. I had actually been thinking about doing it when my favorite bloggers decided to spray paint some of their hardware. I took it as a green light from the blogiverse to start my project. Luckily I was able to complete with materials that I already had on hand.
First, I unscrewed all the hardware from the dresser. Then I stabbed holes in a box about 2 inches apart from each other using a screw driver. I then loosely screwed all the knobs into the holes in the box. Once the knobs were in the box, I set the box down and set all the knobs so that they were facing up.


I used two types of spray paint for this project: a white Rustoleum Painters' Touch primer from Home Depot, and a metallic Design Master Brilliant Gold spray paint that I picked up from Michael’s a while ago when I repainted some picture frames. Warning: This brand of gold spray paint smells a little funky.

First I sprayed a thin layer of primer on the knobs while they were facing up on the box. The layer didn’t quite cover, but that was OK because I planned to put another layer on it. After I sprayed the tops, I put my hand in the box and flipped them over, letting the knobs hang from the box so that I could easily spray the sides and skinny parts of the knobs. Then I flipped the box back over and let the knobs dry sitting straight up again. Unfortunately I was so focused that I forgot to take a picture of this step in the process L.
Once I had sprayed two layers of primer on the knobs, I moved on to spraying the knobs gold. I used exactly the same process to spray the knobs gold as I did with the primer. This type of paint dries kind of matte, so I didn’t have to worry too much about ruining the metallic finish. And because I planned to add a patina to the finish, I knew that if the gold finish had a few imperfections they probably won’t be visible.

After I the second layer of gold paint dried, I took the knobs inside and set up a work station with the knobs, a small paintbrush, some paint, and a rag that I cut from an old t-shirt. I used an off-white Martha Stewart paint sample that I bought over the winter from Home Depot (and also used to paint the IU on my boo’s chair).

To add the white patina, I simply brushed on a coat of white paint to the face of the knob, making sure that I got paint in all the crevices. Then I took my rag and rubbed off the paint, leaving a thick-ish coat of paint in the crevices and a light layer of patina on most of the smooth surfaces. After I got top painted, then I brushed paint onto the sides and the neck of the knob and then wiped it off, making sure to leave a light layer of patina. The knob looks especially good if you can get a little bit of shine through in some spots. I painted and buffed off the paint one knob at a time, as I found that the paint started to dry and was harder to buff off if I tried to paint two knobs at a time.


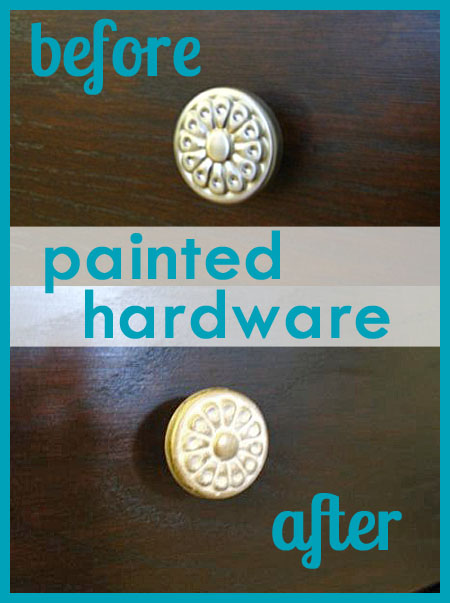
Once the paint dried (which didn’t take long), I put the knobs back on the dresser and admired my work. I also made a somewhat miserable attempt to photograph the finished product. Hopefully you get the picture. I’m much happier with this new finish. It has a bit more character and matches the style of my room better. Of course I’d still love some slightly more stylish knobs, perhaps of a different shape, but this is an excellent no cost alternative.
|
| Before |
 |
| After! |
If you were to tackle this yourself without already having the materials, you should be able to get spray paint for under $10, so it wouldn’t be an expensive upgrade at all. Next time you see beautiful hardware you love but can’t afford, look around at Home Depot or Lowes and think about how you can upgrade that inexpensive hardware to look more like the designer pieces!

You need to make your way down to Fredericksburg to visit Hobby Lobby!! They have plenty of "anthropoligie like" hardware for so cheap! And just a few more items that may interest you!(That's an understatement BTW.) _Amy
ReplyDelete