
I was ready for a fresh furniture start when I finally moved out of my parents’ house after living at home for a year after college. When I originally moved back into my parents’ place, I replaced my childhood twin bed with the full big girl bed that I purchased in college. I knew my headboard from college would look too small in my new (master!) bedroom, and I wanted something a little more grownup this time around. Rather than do the all-white furniture thing again, I was looking for a dark wood piece to contrast with my light blue and white bedding, and mix with some white vintage pieces. I absolutely love the combination of light blues and whites with dark wood, like the elements in these inspiration rooms:


Jordan & Landon's kitchen/dining room from a Young House Love house crashing
I took to my reliable source, Craigslist, searching for a “new” bed. My original specs:
- Full bed (reusing the mattress I had in college)
- Budget: $60
- Solid wood
- Preferably dark wood (but willing to refinish)
- No footboard (or low footboard)
- On the larger side
Unlike a retail store, Craigslist sellers aren’t concerned with covering overhead and they aren’t trying to turn a profit in a production to sales sense. This means that things like time, space, and convenience govern the price of an item in addition to its physical condition and subsequent value. I’ve found that when people are trying to get rid of stuff, they sell it at pretty amazing prices, so I wasn’t concerned with my budget.
Although I had a limited budget, I still wanted a solid piece of furniture. When searching for furniture I look for solid construction, including solid wood (or solid wood with a veneer) and solid joints. This way I know that the furniture will hold up to moves, refinishing, and that it will actually be worth something if I decide to sell it later. Also, call me a furniture snob, but I like living in a space that I know has high quality items (at a good price of course). Because I prefer to pick up solid furniture on the cheap, I look for used stuff on Craigslist rather than going to Target or Ikea right away, keeping the particleboard to a minimum and saving money since real wood is often hundreds of dollars, even at Ikea.
In addition to the tight budget, you probably noticed that I had specific footboard requirements. I feel that big footboards, especially solid ones, break up the space in the room. I think that my 6’3” bf appreciates this decision as well (he has a hard enough time with the full bed).
I searched for a few weeks for a bed that I loved. Finally, I came across a full sleigh bed with a low footboard and large sweeping headboard that I had to have. Only problem? It was way above my budget: $150. I found myself caught somewhere between loving the piece and hating the price. That place must’ve been closer to loving the piece because I did email the owner right away (a must if you actually want to purchase a prized piece), but didn’t hear from the owner for the rest of the afternoon. As I went to bed I found myself really hoping that I would lay my head on the Craigslist bed in my new place. It was actually a great price for a bed, even if my original price standards were, well, lower. I also really loved the sophisticated lines of the bed, which were still curvy and feminine without being too girly.
The next morning I had an email from the owner saying the bed was mine, so I pulled my teenage bro/mover out of bed and went to pick it up. It was in great shape with the exception of a scratch or two, so we loaded it into the family minivan and toke it home.
I should probably mention at this point that the bed was actually Pottery Barn’s Valencia sleigh bed, which I have admired for years. My point of hesitation was that the bed was a discontinued honey oak color, and I was looking for dark mahogany-espresso. But looking for furniture on Craigslist is a lot like shopping for house; if you want a real gem for a good price, you have to look for potential. I had never stained anything before, but this didn’t look too complicated. Annnnnnd $150 didn’t seem too bad when I found that my dream bed is still selling at Pottery Barn for over $1,000 with shipping (!!!!!!).

Pottery Barn Valencia Bed -- the color I want (not the Honey Oak)
Nixing the Honey Oak
I decided to strip the wood since the finish was difficult to sand off and a needed to remove the finish as thoroughly as possible because I was working with a large flat surface that needed to be uniform. The can of finish/paint stripper said that I should let it sit on the surface for 10-20 minutes, but I found that it seemed to evaporate faster and by the time 10 minutes had past the finish didn’t come off very well. Instead, I let it sit for 2-5 minutes, and then scraped it off with the stripping tool and/or putty knife, depending on the spot. I wore thick latex gloves to do this (thicker than dishwashing gloves) to protect my skin from the corrosive stripper. I removed as much finish as possible, keeping in mind that I would give the thing a solid sanding when I finished the stripping process.
Here’s the bed mid stripping process:
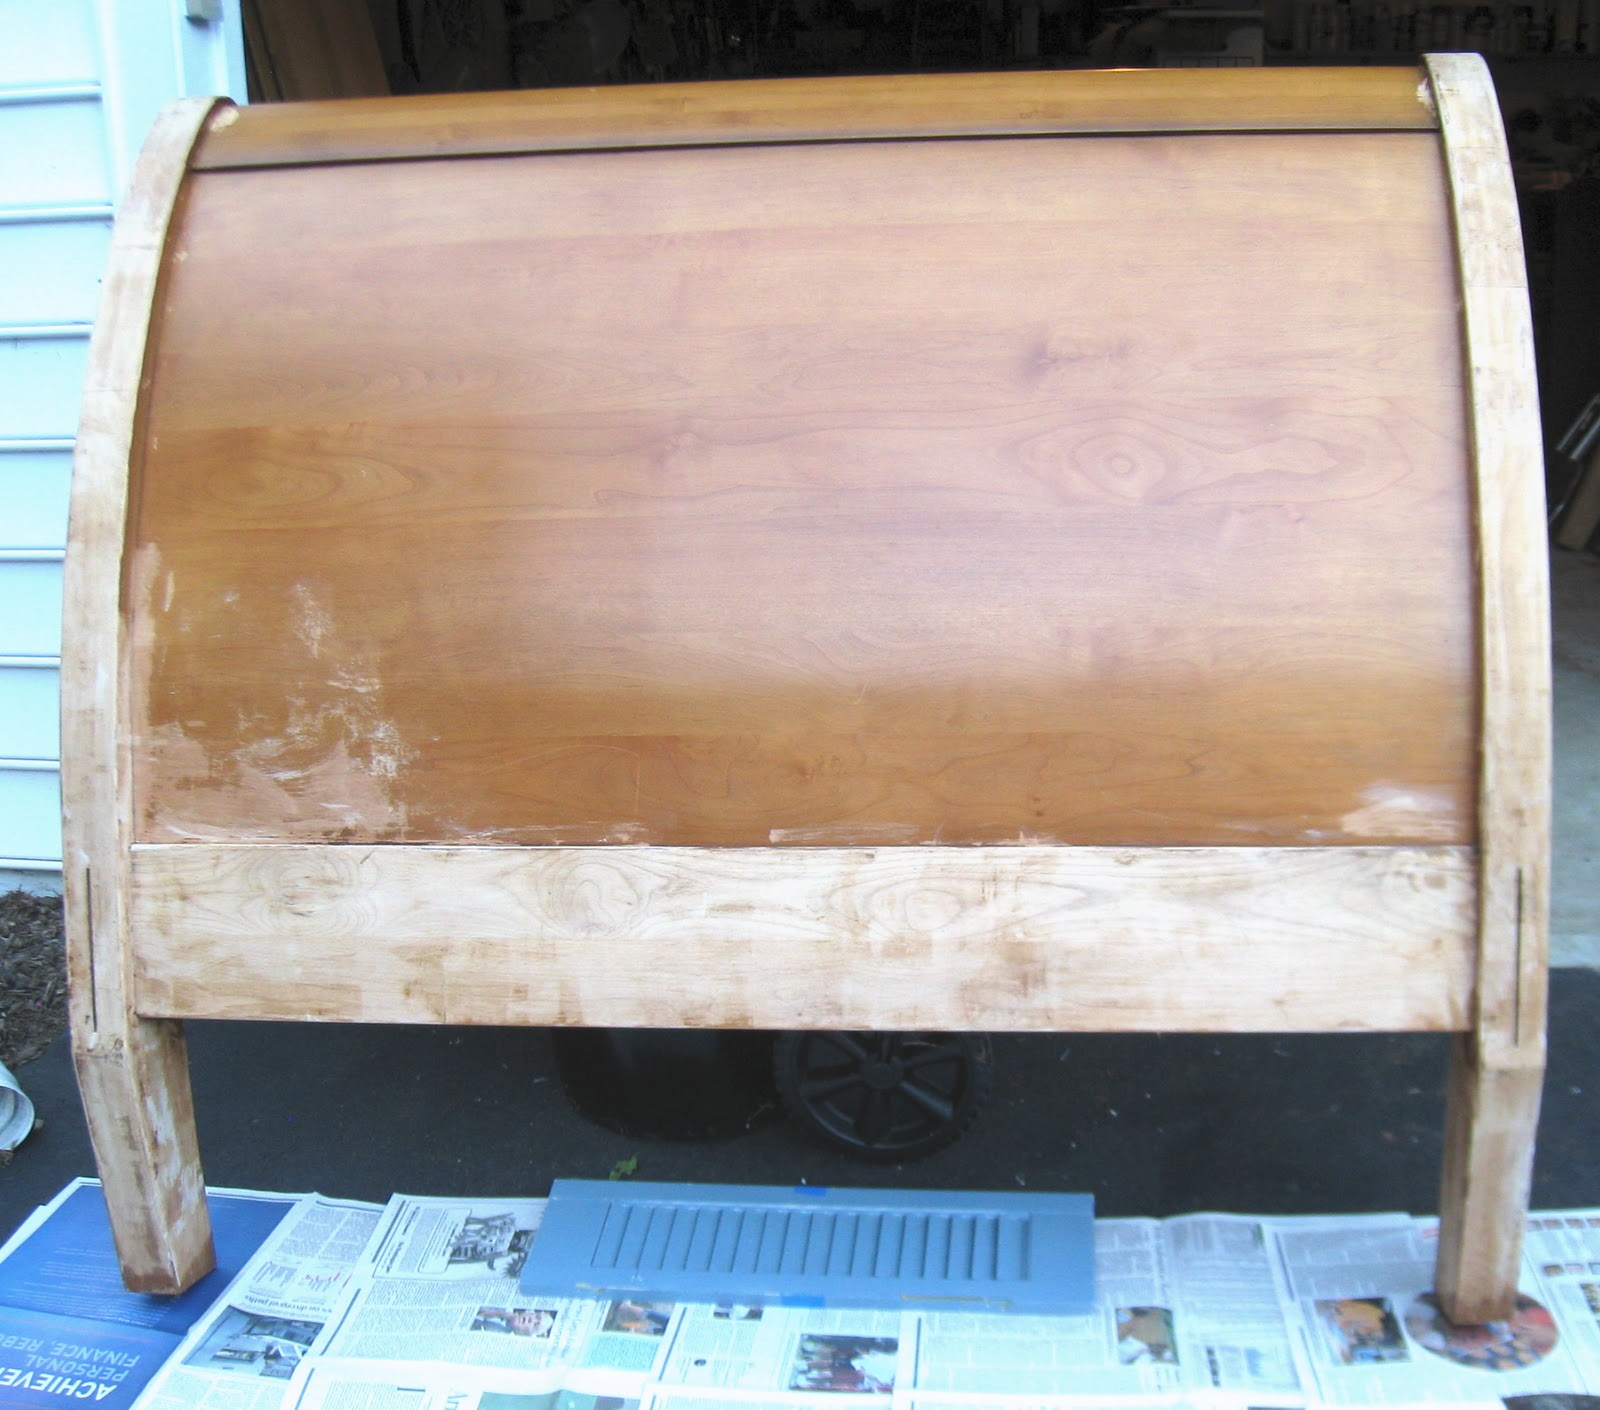
After cleaning the wood with mineral spirits and steel wool , sanding it with my electric mouse sander (OK, my parents’ mouse sander), and sanding it by hand, I moved on to the staining process.

Headboard post-stripping process (pre-sanding)
Project Materials:
- Polyurethane (multipurpose) stripper (Home Depot)
- Plastic putty knife (Home Depot)
- Stripping knife/tool (Home Depot)
- Thick latex stripping gloves (Home Depot)
- Mineral spirits (Home Depot)
- Fine steel wool (Home Depot)
- Newspaper/drop cloth (Used newspaper/new drop cloth that my operating room nurse friend brought me from her hospital)
Staining
This was my first attempt at staining something, so it was definitely a learning experience. First, I had to pick out a color. I went to a hardware store and picked up some color samples. After testing the samples on the back of the footboard, I decided I didn’t like either color. Realizing that I had been going about things all wrong, I took to the internet searching for colors/brands that were similar to the type of thing I was looking for. If you’re reading this blog, then you probably already know to do this type of thing, but in case you don’t, PLEASE take this piece of advice: you will rarely encounter an occasion when someone else hasn’t already attempted what you’re currently attempting (especially if you’re pulling from an inspiration space), so learn from the experience of other DIY-ers and do a little Googling before you attempt something. After doing some online research, I discovered that either General Finishes’ Java gel stain or Espresso water-based stain would give me deep, rich color I wanted. When searching for colors, keep in mind that stain takes differently to each wood, and colors vary based on the type of wood you’re working with, how many layers you put on, and the length of time that the stain sinks in.
I tested both the Java and Espresso on the back of the footboard and decided to go with the Java because the Espresso had slightly grey undertones, and I was looking for more of a milk chocolate. After I decided on the finish, I sanded down the test areas (even though they wouldn't be visible).

The Java was a gel stain, which I applied with a rag. I read that some people didn’t like working with gel stain, but I thought it was actually kind of nice while working on a vertical surface. Unlike liquid stain, the gel sits on the surface more, so it takes a little longer to sink in. I let the stain sit on the wood for about 5 minutes, and then used a rag to buff off excess stain. This is a lengthy process and requires some elbow grease. The first coat looked a little splotchy, but the look evened out after a few more coats. I used three coats of stain, leaving some areas a little thicker than others to even out the color.

A slightly splotchy first coat
Once I finished the staining process, I used a foam brush to apply four coats of General Finishes Topcoat. I thought that this would be a bit of a stressful process. After all, I didn’t want to ruin my staining job with the topcoat. But I found that it was actually the easiest part. I used a foam brush and ran one long stroke from one side of the headboard to the other in order to create the smooth coat. Most of the brush strokes faded as the finish dried. After using the foam brush on the finish, I wished I had used it for the stain as well. All-in-all, I applied three coats of finish to the bed.

Headboard, finished
Project materials:
- Old t-shirts to make lots of rags
- Drop cloths (Used newspaper/new drop cloth that my operating room nurse friend brought me from her hospital)
- General Finishes Java Gel stain (about ½ quart, purchased from local woodworking store)
- General Finishes Topcoat (a little bit more than the stain, purchased from local woodworking store)
- Many foam brushes (Home Depot)
The finished product doesn’t look exactly like its PB cousin, but it’s pretty close. For about $200 total, I’m quite content to lay my head in my new big girl grownup bed! For any of you that have been intimidated by the thought of staining furniture instead of painting it, I definitely encourage you to try it -- even if it's just a small table at first, it's a great skill to add to your furniture re-do repertoire.

The finished product. Excuse the total lack of furnishings/too small nightstand in the background. I also need to get a few more throw pillows.


holy cow! love it! i'm your newest follower! stop by when you have a minute!
ReplyDeletexoxo
Ashley